


Visitors are greeted into an overflowing laundry and mudroom connecting straight into the tiny, dated, eat-in kitchen. Clunky, energy-sucking appliances, and a fuel-oil heating system that currently doesn't work.
We were forced into biomass heating (pellet stove) 2 years ago because it was the only option we could afford. Not because we couldn't afford to have gas run to you and a new furnace put in, but because your walls have no insulation "entirely clapboard, like a barn" they said when they came to "seal up" the energy leaks in the house that first year we were in here. Originally, you were a 2 room farmhand house, with no running water or electricity. There were fireplaces in the basement and the main living quarters which were kept roaring all winter long... you didn't need insulation.
You have 1.5 bathrooms, neither of which have ventilation. One used to be a closet space in the attic, and the other a hallway between the 2 main living areas. A baseboard heater runs almost smack through the middle of the floorspace of the "hallway" bathroom... making it nearly impossible to move with more than one person in the room. We cram all 4 of us in there every night for bathtime.
Your roof is sagging in places, your yard is mostly moss and weeds, no vegetable crop grows easily in the rubble and backfill that composes your yard. Your barns and out buildings were plowed under to make room for the encroaching track neighborhood surrounding you...
You have Tony's gravestone in your backyard. "Tony 1933-1936"... I have no doubt that it's real.
You only really have 2 bedrooms... and half of the space downstairs serves as a 3rd.
Your basement has rough hewn logs holding up the rest of the house and a dirt floor. It's always 55 degrees and the cold leaks up through the slatted old wooden floorboards both in the summer, and winter.
None of your walls are straight and somehow that makes me feel a little bit more easy...
And you are lived in and have been continuously for the last 150 years. You've been decorated and climbed upon, and scratched and barked at, and cried and screamed and laughed in. Your kitchen smells like my Grandma's used to, and your basement is an honest to god wine and root cellar. Your kitchen counters are made for canning and for standing around. Our table just doesn't fit... eventhough there's no other possible place to put it. So we're all just here, together.
Your old floor boards are the color "vermont maple" and they're worn and uneven and rich and alive under bare feet. Stained glass and window boxes make sense.
And you inspire greatness. "this little place could be a jewel". You make me want to repair and replace and be historically correct about it... So that I can put a little 1860 plaque above your front door and get you on the town register of historical buildings. You make me want to insulate and side you so that everything matches and is neat as a pin. You make me want to get a custom made copper claw bathtub, and one of those toilets with a pull chain and wall-mounted tank... and to plant 1860's appropriate flowers all over the yard and to grow a market garden...
But we aren't carpenters or plumbers or general contractors, and we're living on 1 income and have limited time and energy to dedicate...
We're a growing family and we know how the majority of the people around us live. We're more often than not in eachother's way and sometimes curse your poor layout. We even went so far as to ask our real estate agent how to get the house ready to sell...
We were told we our "inspired" plans surely wouldn't pay off and that we wouldn't recoup the cost.
... but you could be a little jewel... and you inspire me to make rosewater, and wild grape jelly, and blackcap wine... and to wildcraft, and to be outside, and to be crammed together in one room with family and friends...
And in the summer the scent of peony and lilac drift through your windows beaconing "come and see what's new, come and see what you can do..."


Corn-Free,
Dairy-free,
pie crust,
pie filling,
Rhubarb,
Spring
Rhubarb Pie... because the rhubarb hasn't quit yet!
11:40 AM
Well, I made a pie. If there's one thing about me and my cooking that you should know is that I really, REALLY don't like pie crusts and I don't ever make pies. I make crisps, and crumbles and cakes and quickbreads and muffins... but I do not like making pies.
But, come on, I HAD to. Who doesn't make pie out of rhubarb? I caved and I did what (probably most) people do when they make a "homemade pie"...I bought the crust at the store! Yep, I cheated. Check this out: Dairy free, corn free, and they even have a gluten-free version. I have to say I'm in full support of Wholly Wholesome pie shells.
And so, while my shells thawed, I put together the filling.
Fresh Rhubarb Pie
Filling
4 cups chopped rhubarb
1 1/3 cup white sugar
6 tbsp a.p. flour
1 tbsp Earth Balance Margarine
2, 9 inch pie crusts.
1 egg
white sugar for dusting
Preheat oven to 450f.
Combine the sugar and flour and then put 1/4 of the mixture in the bottom of one of the pie crusts. Mound rhubarb inside the crust and then cover with the rest of the flour and sugar mixture. Dab bits of margarine evenly over the top of the fruit and then cover with the 2nd crust.
At this point in the game, my top crust broke. A lot. I got mad, and then I used a wet fork to smash/seal the cracks shut. It worked! I then added a bit more water around the edges of the pie and pinched them together with the fork.
With a pastry brush I then coated the top of the pie with egg white and dusted it with additional sugar. Finally, I cut a heart-shape in the top.
I put the pie on a cookie sheet to avoid a sticky mess in the oven if it should overflow during the baking process. It baked at 450f for 15 minutes, and then at 350f for an additional 45 minutes.
I let the pie cool for as long as we could stand it (which wasn't long).
Enjoy!
Corn-Free,
Dairy-free,
Diabetic friendly,
Herbal Remedies,
Herbal tea,
infusion,
Red Clover,
Spring,
trace-minerals,
Vegan,
Wheat-free,
Wildcrafting
Wildcrafted Red Clover for Tea and Infusions
12:44 PM
About a week and a half ago I brought my 2-year-old to the far side of the neighborhood pond. She threw rocks and sticks in the water and picked a few early Daiseys, and then came home for a nap. While we were out there, I noted that the Red Clover were high and almost ready to blossom and when I got home, I made note that last year's clover stash was dwindling.

Lets rewind a bit here. Whatever prompted me to make red clover flower tea in the first place? Well, I read up on it a while back and found out these things regarding the effect of this flower's estrogen and isoflavones on women who were dealing with infertility and other menstrual issues (it took us a year to get pregnant with child #1 due to some of the imbalances I was dealing with). The medical community finds many of the claims made for the usefulness of Red Clover to be inconclusive, but does note that women use it to control symptoms of PMS etc and to even out estrogen levels (as long as the quantities taken aren't in excess). Susun Weed, my favorite herbalist, attests "Dozens of women have told me that they had successful pregnancies after drinking a cup or more (up to four cups) a day of red clover infusion" and notes that "An infusion (not tea, not tincture, not capsules) of red clover blossoms, leaves, and stems is not only very high in protein, macro- and trace-minerals, and vitamins (except B12), it is an excellent source of phytosterols. Phytosterols are hormone-like substances found in many plants that can be bio-converted in the human gut into active anti-cancer estrogens and other helpful anti-stress hormones. Calling phytosterols phytoestrogens is confusing, as it implies harmful, not protective, effects."
Well, I ended up finally getting pregnant with baby #1 during the winter months, and didn't get to try out the Red Clover idea (not safe for pregnant women, btw).
HOWEVER! 18 months after my first baby was born, I decided that if I wanted to have another child, fairly close in age to my first, I should start getting my body back to healthy/fertility mode sooner than later. Also, it was June at this point and the Red Clover were out and beautiful. I picked a bagful and dried it over the next couple of weeks. I started drinking the tea and THAT MONTH I found myself pregnant with baby #2! I didn't even get to finish my stash. Now, whether this was complete coincidence, phytoestrogens, restored trace minerals or what, I don't know...but this is my personal experience with Red Clover.
It also tastes nice as a tea or infusion (think "grassy" or fresh mown hay), looks pretty, is nutritionally beneficial, and it's FREE and abundant!
So, yesterday I took a shopping bag over to the far side of the pond and it was a good thing that I did... here's what I found:


I picked just the ariel parts ( flowers and top leaves). Brought them home and spread them out on trays lined with paper toweling to dry.
 I'm convinced 1 single layer is key to drying. I've had people tell me they have problems with their flowers molding, but I've never run into this issue. Just make sure to dry them in a well-ventilated area.
Dry for 2-3 weeks and then store in an airtight container. My favorite way to prepare these is to take a handful and put it in a teapot and then cover it with boiling water.

 Let it steep for a while, then enjoy!
... And don't say I didn't warn you if you find yourself pregnant out of the blue ;-)
Lets rewind a bit here. Whatever prompted me to make red clover flower tea in the first place? Well, I read up on it a while back and found out these things regarding the effect of this flower's estrogen and isoflavones on women who were dealing with infertility and other menstrual issues (it took us a year to get pregnant with child #1 due to some of the imbalances I was dealing with). The medical community finds many of the claims made for the usefulness of Red Clover to be inconclusive, but does note that women use it to control symptoms of PMS etc and to even out estrogen levels (as long as the quantities taken aren't in excess). Susun Weed, my favorite herbalist, attests "Dozens of women have told me that they had successful pregnancies after drinking a cup or more (up to four cups) a day of red clover infusion" and notes that "An infusion (not tea, not tincture, not capsules) of red clover blossoms, leaves, and stems is not only very high in protein, macro- and trace-minerals, and vitamins (except B12), it is an excellent source of phytosterols. Phytosterols are hormone-like substances found in many plants that can be bio-converted in the human gut into active anti-cancer estrogens and other helpful anti-stress hormones. Calling phytosterols phytoestrogens is confusing, as it implies harmful, not protective, effects."
Well, I ended up finally getting pregnant with baby #1 during the winter months, and didn't get to try out the Red Clover idea (not safe for pregnant women, btw).
HOWEVER! 18 months after my first baby was born, I decided that if I wanted to have another child, fairly close in age to my first, I should start getting my body back to healthy/fertility mode sooner than later. Also, it was June at this point and the Red Clover were out and beautiful. I picked a bagful and dried it over the next couple of weeks. I started drinking the tea and THAT MONTH I found myself pregnant with baby #2! I didn't even get to finish my stash. Now, whether this was complete coincidence, phytoestrogens, restored trace minerals or what, I don't know...but this is my personal experience with Red Clover.
It also tastes nice as a tea or infusion (think "grassy" or fresh mown hay), looks pretty, is nutritionally beneficial, and it's FREE and abundant!
So, yesterday I took a shopping bag over to the far side of the pond and it was a good thing that I did... here's what I found:
I picked just the ariel parts ( flowers and top leaves). Brought them home and spread them out on trays lined with paper toweling to dry.
Dry for 2-3 weeks and then store in an airtight container. My favorite way to prepare these is to take a handful and put it in a teapot and then cover it with boiling water.
... And don't say I didn't warn you if you find yourself pregnant out of the blue ;-)
Corn-Free,
Dairy-free,
from scratch,
grill,
Little Kids in the Kitchen,
Pizza,
pizza crust,
pizza sauce,
slow food,
Spring,
yeast
Pizza on the grill (homemade yeast crust recipe)
10:46 AM
We've been trying to grill as much as possible lately not only because it's delicious and a change of pace from cold weather cooking, but also because the girls can run around like crazy outside while we're making dinner. What a reprieve from the usual blaring kids tv shows and bickering hungry siblings who are trapped inside at dinnertime.
I admit, I was skeptical about putting raw pizza dough on the grill. I was certain it would just fall through the cracks and make a mess... but I was wrong! We made "personal sized" pizzas by putting flattened raw dough straight onto the grill and flash grilling both sides. The result was toasty, crispy, amazing pizza crust that we then added toppings to and continued to grill on a low setting until the (Daiya) cheese melted.
The dough was made ahead of time and frozen until we were ready to use it so this was a great weeknight dinner choice.
Add a little oil to each side of the pizza crust, and to the grill surface. Grill the dough on high on either side.


 Enjoy!
I admit, I was skeptical about putting raw pizza dough on the grill. I was certain it would just fall through the cracks and make a mess... but I was wrong! We made "personal sized" pizzas by putting flattened raw dough straight onto the grill and flash grilling both sides. The result was toasty, crispy, amazing pizza crust that we then added toppings to and continued to grill on a low setting until the (Daiya) cheese melted.
The dough was made ahead of time and frozen until we were ready to use it so this was a great weeknight dinner choice.
Homemade Pizza Crust (yeast version)
*This crust is a 2-day process... so plan accordingly OR use my yeast-less recipe
4 1/2 cups AP flour
1 3/4 tsp salt
1 tsp instant yeast
1/4 cup vegetable oil
1 3/4 cups ice water
Semolina flour for dusting
Stir together flour, salt and instant yeast in a large bowl (or an electric mixer). With a large metal spoon, stir in the oil and cold water until the flour is completely absorbed. Kneed the dough for 5 to 7 minutes until it becomes a solid, smooth mass and the ingredients are evenly distributed. You may need to dip your hands in water a few times (or use a dough hook on an electric mixer) to keep the dough from sticking to you. The finished dough will be springy, elastic, and sticky and will register between 50-55 degrees f.
Sprinkle flour on the counter and transfer the dough to the counter. Prepare a sheet pan by lining it with baking parchment and misting the parchment with spray oil (or lightly oil the parchment the old-fashioned way with a brush). Using a metal dough scraper, cut the dough into 6 equal pieces (for personal-sized pizzas, you could also cut it into 2 larger pieces for family-sized crusts). Dip the scraper in water between cuts to keep the dough from sticking to it. Sprinkle flour over the dough then make sure your hands are dry and sprinkle them with flour too. Lift each piece and gently round it into a ball. Transfer the dough balls to the baking sheet. Mist the dough generously with oil and cover the pan with plastic wrap.
**Put the pan into the refrigerator overnight to rest the dough, or keep for up to 3 days.
If you want to use some of the dough for future baking it can be frozen in ziploc bags after the initial 24 hour rest period. Simply dip each dough ball in a bowl with a few tbsp oil in it to coat and then put each ball into a seperate ziploc bag. The dough will keep in the freezer for up to 3 months.
And so, we come to our weeknight, outdoor dinner recipe!
Personal Pizzas on the Grill
Take your dough balls out of the freezer and let them come up to room temperature. This may take a few hours, OR if you're like us, you can cheat and put them under a heat lamp (which hubby just happens to have for helping dough rise on cold, damp days).
When the dough is room temperature, shape it into little personal pizzas.
Add a little oil to each side of the pizza crust, and to the grill surface. Grill the dough on high on either side.
They DO NOT fall through the cracks!
Once the dough is cooked through (happens FAST) turn down the heat and transfer crusts to the top rack (if you have one), add sauce and toppings of choice. Pictured is sauce (re-hydrated tomato paste, garlic powder, oregano, basil, and fennel seed), Daiya Mozerella, mild italian sausage, onions, peppers, zucchini, and mushrooms.
Corn-Free,
Dairy-free,
Fermentation,
from scratch,
Rhubarb,
slow food,
Spring,
traditional fermentation,
Vegan,
white sugar,
whole foods,
wine
DIY "Dry" Rhubarb wine from Great Grandpa's Strawberry Rhubarb
12:22 PM
When my Grandma immigrated from Germany to the USA she didn't bring much with her, but she did bring a chunk of rootstock from her father's Strawberry Rhubarb. Strawberry rhubarb differs from regular rhubarb in that it generally has a smaller stalk that is a pretty pinkish red color. My grandma, my mom, and I all have offspring from great grandpa's rhubarb plant growing in our yards... mine's a little small and sad, but mom's was big this year and she's been harvesting.


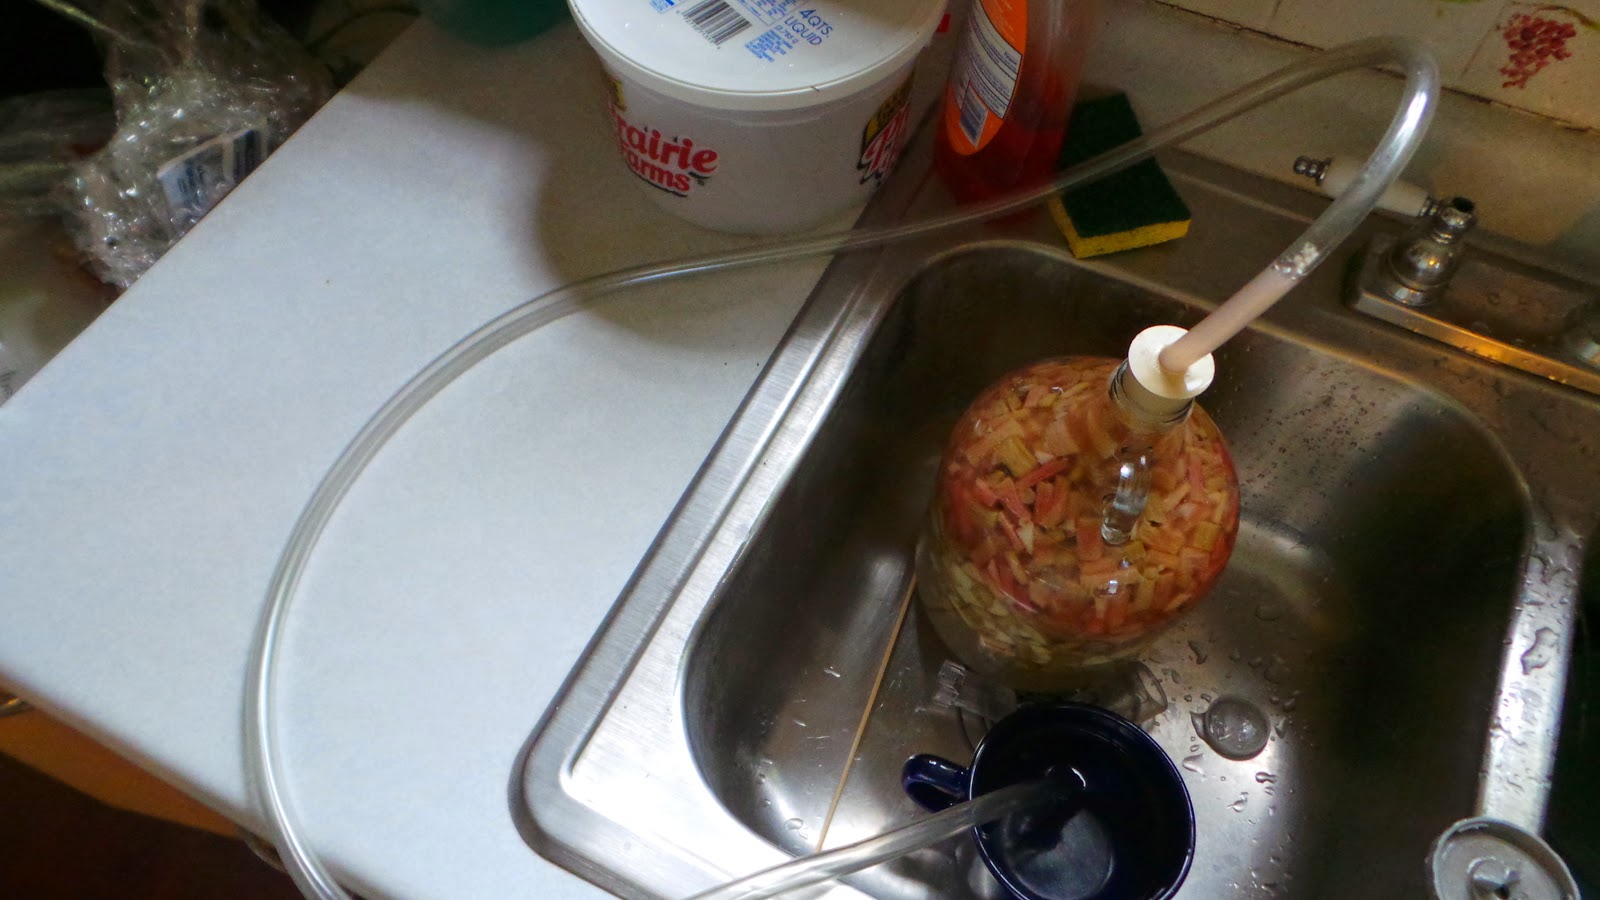 Our fermentation process went a little crazy... so we added a blow-off tube. This is in a 1 gallon jug... which is why I said to use a 2 gallon jug in the directions ;-)
my tiny plant
cleaned stalks that my mom harvested from HER plant.
I've made this wine one other time in the past, and I did a bit of a variation this time based on the ingredients I had on hand. It is based on a recipe for "dry" wine, but last time it ended up being fairly sweet and very delicious. My bet is that we'll have similar results this time around.
Rhubarb Wine
3 lbs(1.4kg) rhubarb stalks, sliced into small pieces
8 oz (240g) chopped apple or golden raisins
2 1/2 lbs (1.14kg) white sugar
1 tsp (5g) pectic enzyme
1 Campden tablet (Optional)
1 package wine yeast
1 tsp (5g) yeast nutrient
juice of 1 orange
Put rhubarb and apples (I used apples instead of golden raisins b/c my hubby and kids ate all the raisins... aaaand because we do live in apple country, afterall) in a 2 gallon fermentation vessel that can be fitted with an airlock. In a medium saucepan, bring 1/2 gallon (1.9 L) of water to a boil and add the sugar. Once the sugar is dissolved, pour the water over the mixture in the fermentation vessel. When the mixture is cool, add the pectic enzyme, and Campden tablet. Let stand for 24 hours.
In a jar, make a yeast starter culture by combining the wine yeast, yeast nutrient, and orange juice. Cover and shake vigorously. Let stand 1 to 3 hours or until bubbly; then add to must (mixture in fermentation vessel). Cap the vessel with an airlock.
Our fermentation process went a little crazy... so we added a blow-off tube. This is in a 1 gallon jug... which is why I said to use a 2 gallon jug in the directions ;-)
Ferment for 2 weeks; then rack off the solids. Top off with additional orange juice if necessary, recap with an airlock, and let ferment for another 10 weeks. Then bottle and cellar the wine.
Wait at least 6 months before sampling.
Enjoy! This is one of my favorites and will be ready right around the Holidays.
canning,
Corn-Free,
Dairy-free,
Diabetic friendly,
Dolmades,
foraging,
from scratch,
Grape leaves,
preserving,
slow food,
Spring,
Vegan,
Wild Grape leaves
Dolmades anyone? The wild grape leaves have just unfurled and are absolutely perfect
2:08 PM
Admittedly, with 2 young kids in the house the "veggie growing" portion of my mini-homestead lifestyle has been... uuhh... lacking. But, living in a house that has been here for over 150 years in an (albeit formerly) agricultural community, has some inherent perks. The now wild grapevines growing in the hedgerow are certainly to be counted among those perks. Yep. I've torn a good amount of them down, but they keep coming back (go figure) and they are actually quite useful if you take the time to process and prepare what they have to offer.

The leaves have unfurled bright green and tender over the last couple of weeks, so I decided to pickle a small batch for later use as "wrappers" for Greek Dolmades.
This was super-easy and the recipe I based it off of was very intuitive and fun to do. My kind of canning!

The leaves have unfurled bright green and tender over the last couple of weeks, so I decided to pickle a small batch for later use as "wrappers" for Greek Dolmades.
This was super-easy and the recipe I based it off of was very intuitive and fun to do. My kind of canning!
Preserved Grape Leaves for Dolmades
Modified from honest-food.net's recipe
20 to 40 grape leaves, stems removed
Seasalt
1/4 cup lemon juice
1 Pint-sized jar with lid
That's it!!
- Bring a large pot of water to a boil and add enough Seasalt to make a brine that "tastes like the sea".
- Get a large bowl of ice water ready.
- Boil the grape leaves for 30 to 45 seconds, then plunge into the ice water to cool. Drain them once the leaves are all cool.
- Take about 6 grape leaves at a time and roll them up into a cigar from the side — not the top or bottom. You will need to fold over the leaf end to fit into the pint jars. Pack the grape leaves into a clean (disinfected) pint jar, making sure you have about 1 inch of head space at the top.
- Add the lemon juice to the pint jar. Bring the water you used to cook the grape leaves back to a boil and ladle it into the jar to fill the rest of the way. Make sure the grape leaves are covered with the brine. Wipe the edge of the pint jar with a clean towel and seal the jar.
- Let cool on the shelf until the jar lid seals itself, then store in the refridgerator until you're ready to make Dolmades.


